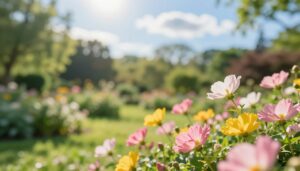
I’ve always relied on neutral density filters to turn ordinary daylight scenes into serene, museum-quality images. When I point my camera out a window at 2pm, it reads f/11 at 1/400 second at ISO 100. That baseline helps me choose the right filter and shutter speed for creative results.
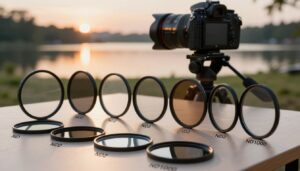
In my work I often use a 10-stop neutral density filter to lengthen shutter speed. By placing high-quality glass in front of the lens, I block light and slow the shutter enough to blur waves, clouds, and moving elements. A test with a NiSi 15-stop filter in Ecuador and a 90-second seascape in Phoenix showed how powerful density filters can be.
The small adjustment that improved my long exposure results
When I first started shooting long exposures, I focused too much on getting the exact shutter time and forgot about everything around it. I had situations where the settings were technically correct, but the final image still didn’t feel right. Over time, I realized that small adjustments before pressing the shutter often matter more than chasing perfect numbers.
From my experience, taking a moment to review the scene—checking highlights, stability, and composition—made a bigger difference than constantly recalculating exposure. Especially with strong ND filters, once everything is set, there’s no easy fix if something shifts during the shot.
I learned that slowing down before the shot leads to better results than trying to fix things after.
If I could give one practical tip, it would be this: always take a quick test shot without the filter and analyze it carefully. It helps you confirm exposure, framing, and focus before committing to a long shutter, saving time and avoiding frustration.
In the end, long exposure photography isn’t just about settings—it’s about preparation, patience, and building a consistent routine that supports reliable results.
This method is simple but transformative. For landscape photographers, controlling light and stops lets you craft dreamy water and soft skies. Understanding the filter, the camera settings, and timing is the key way to get consistent, pro-level shots.
Key Takeaways
- Neutral density filters let you slow shutter speeds for creative blur and smooth water.
- Using a 10-stop filter is a practical way to lengthen shutter speed during the day.
- High-quality glass in front of the lens reduces light and preserves sharpness.
- Test results (NiSi 15-stop and a 90-second seascape) show dramatic sky and water effects.
- Know your camera baseline (f/11 at 1/400s ISO 100) to pick the right stops and seconds.
Understanding the Role of Neutral Density Filters
A neutral density filter is an essential piece of optical glass that reduces the intensity of light entering your lens without shifting color. I rely on these pieces of glass to hold down bright highlights and to preserve true tones in an image.
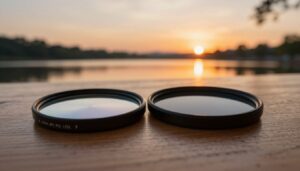
I explain density in stops because that tells you how much the shutter must slow. A 3-stop QuartzLine ND 8 lets more light through than a darker ND 1000, so the resulting shutter speed and final image look will differ noticeably.
Choose the right density for the scene: the lower-stop filter keeps more detail in highlights, while higher density filters force the shutter to open longer for smoother motion and softer skies.
“The primary role of any neutral density filter is to allow for a slower shutter speed, which creates that signature smooth, professional look.”
- The filter reduces light so your camera can use a slower shutter without overexposing.
- Different density filters change how much light is blocked; test them to learn results.
- I always carry several filters to match changing light and speed needs.
Essential Gear for Long Exposure Photography ND
Good gear removes guesswork. Before I dial shutter speeds or stack a neutral density filter, I set up a stout support and a hands-free trigger. These two items are the backbone of stable, sharp images when motion runs for minutes.
Tripods for Stability
A robust travel tripod is necessary to keep the camera perfectly still for several minutes. I pick legs that lock tight and a head that holds my composition without drift.
Without a stable tripod, even the best density filter will yield a blurry result instead of the smooth landscape look I want.
Remote Shutter Releases
Remote remotes or an intervalometer let you lock the shutter open without touching the camera. I always use one to prevent camera shake and to time the shot down to the seconds I need.
When I use a 10-stop neutral density filter, the camera often cannot focus automatically, so a remote is essential to trigger the shutter and record the motion of clouds or water cleanly.
- Sturdy tripod keeps the camera still for minutes.
- Remote or intervalometer prevents shake and ensures exact timing.
- Quality filter + support equals crisp images and smooth motion.
Preparing Your Camera for Long Exposure Shots
Before you attach any dense glass to the front of your lens, set up the camera so focus and metering work predictably. The 10-stop filter is very dark, so autofocus will usually fail. I switch my camera to Manual mode every time for this reason.
Start with a baseline shot without a filter. Take a quick frame to note the shutter speed, aperture, and ISO. That baseline lets you calculate how many stops to remove and how the final shutter needs to run.
Mastering Manual Mode and Focus
Manually focus while the lens is still clear. Then set your aperture and note the exposure value. Removing 10 stops often equals about 30 dial clicks on cameras with 1/3 stop increments.
I use apps like NDTimer to convert baseline numbers into the final shutter time. If you do not set Manual mode, the shutter will not stay open long enough for the desired motion and the image will be ruined.
- Focus before attaching the filter to the front of the lens.
- Switch to Manual mode so autofocus and auto meter do not interfere.
- Calculate stops and aperture, then add the filter and trigger the shot.
| Step | Action | Tip |
|---|---|---|
| Baseline | Take a test shot without filter | Record shutter, aperture, ISO |
| Focus | Manually focus with clear lens | Lock focus before adding filter |
| Calculate | Adjust aperture and compute stops | Use an app for exact shutter time |

“Mastering the manual settings on your camera is the only way to successfully use a 10-stop filter for professional long exposure work.”
Creative Techniques for Capturing Motion
A careful mix of aperture, stops, and timing lets me sculpt motion in a scene. I choose a shutter speed that fits the mood I want, then set the camera and lock composition.
Smoothing Out Waterways
Slow the shutter to turn chaotic water into a painted surface. Using a 10-stop filter in bright day light often drops my shutter to a second or more. That blur makes streams and falls read as a soft, continuous plane rather than frozen droplets.
Creating Ethereal Sky Effects
Cloud movement becomes a design element. A 15-stop neutral density filter can turn a seascape into a four-minute exposure. The result is silky seas and streaked clouds that feel otherworldly against sharp land details.
Achieving a Fine Art Look
I aim for minimalism by pairing a narrow aperture and a steady tripod. Fewer elements and a long shutter give each image a calm, curated look.
- Example: 10-stop filter → shutter of several seconds for water blur.
- 15-stop density filter → multi-minute shot for ethereal skies.
- Vary shutter speeds to explore different moods in landscape images.

“Varying shutter speeds is one of the simplest ways to transform a scene into fine art.”
Overcoming Common Challenges in the Field
I learned early that filter quality and careful handling make the difference between a keeper and a ruined shot.
Color tint is a frequent issue with heavy filters, but glass models like NiSi cut that risk. I rarely need more than minor tweaks with a NiSi 15-stop neutral density filter.
Keep the front glass spotless. Scratches and dust show up on slow shutter images. I clean tools on a towel and check the lens before each shot.
Choosing a 10-stop filter is usually my starting point for daytime work. It controls light, lets me record cloud motion, and reduces blown highlights.
“Patience in the field pays off: wait while the shutter runs and review each frame carefully.”
- Use glass filters to avoid color casts and scratches.
- Carry a blower and cloth to protect the front of the lens.
- Start with a 10-stop when the sky is bright and aim for a few seconds of motion.
| Challenge | Cause | Fix |
|---|---|---|
| Color tint | Lower-quality material | Use glass filters like NiSi; minor post adjustment |
| Dust or scratches | Poor handling in the field | Clean before each shot; store in a case |
| Overexposed sky | Too much light | Attach 10-stop filter; lower ISO; slow shutter |
Conclusion
, A good filter can change how a scene reads and lift ordinary frames into striking images with a refined look.
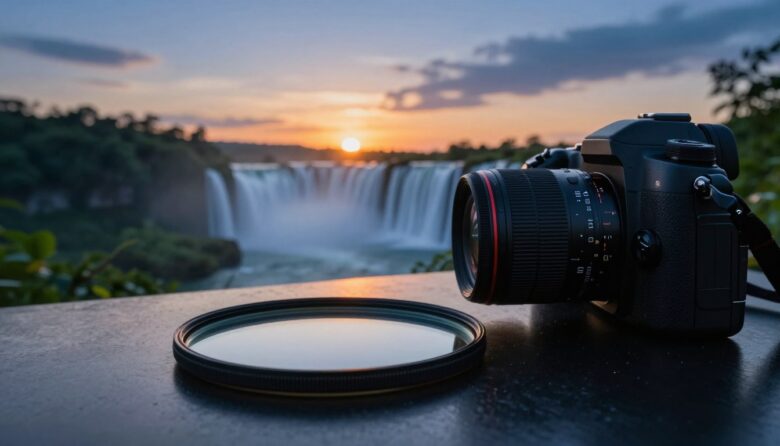
I recommend investing in high-quality glass. A NiSi 15-stop neutral density filter I tested in Ecuador remains one of my favorite tools for landscape and architectural work.
Mastering shutter speed and exposure is as important as your gear. Set focus, lock the camera, and use a steady lens mount to get consistent results.
If you feel stuck, adding a 10-stop filter to your kit is one simple way to push your photos forward. Thank you for following this guide; I hope it inspires your next shoot.
FAQ
What does a 10-stop neutral density filter do and why use it?
A 10-stop neutral density filter blocks a large amount of light, letting me use much slower shutter speeds during bright daylight. That slow speed blurs motion in water, clouds, and traffic to create smooth, painterly images. I rely on this filter when I want dramatic motion blur without overexposing the image.
How do I set my camera when using a 10-stop density filter?
I start with a low ISO and a small aperture to control depth of field, then switch to manual mode. I meter without the filter to determine a base exposure, then calculate the new shutter speed after adding the filter. A tripod and remote shutter release keep the camera steady during the extended shutter time.
Can I focus accurately with a dark neutral density attached?
Focus can be tricky through a very dark filter. I focus and compose before screwing the filter on, or use live view and focus assist if my camera offers it. Locking focus in manual focus mode prevents hunting during the shot.
What tripod features matter most for slow shutter work?
Stability is key. I choose a tripod with a sturdy head, solid legs, and low center-of-gravity setup. Carbon fiber is lightweight and vibration-resistant, but a heavy aluminum model can be more budget-friendly and still steady for multi-second and minute-long exposures.
Do I need a remote shutter release, and what type should I use?
Yes. A wired or wireless remote prevents camera shake when starting and stopping the shutter. I often use an intervalometer for timed exposures and bulb mode control, which helps when I need precise multi-minute shots or sequences.
How do I prevent star trails or subject blur when aiming for smooth water or cloud motion?
For smoothing water and clouds while keeping stationary subjects sharp, I limit the shutter time to a range that blurs only moving elements. If I want pinpoint stars, I use shorter exposures or a tracking mount; for blurred clouds I extend the shutter to several minutes, balancing aperture and ISO to avoid overexposure.
What aperture and ISO settings work best for artistic motion blur?
I set ISO to the camera’s base (usually 100) and stop down the lens to control depth of field—often between f/8 and f/16. That gives me a workable shutter speed range when using a density filter, keeping images sharp while allowing motion to render smoothly.
How do I calculate the new shutter speed after adding a 10-stop density filter?
I take a meter reading without the filter to get a starting shutter speed. Then I multiply that time by 2^10 (about 1,024), which effectively increases the exposure time by ten stops. In practice, I use a phone app or exposure calculator to simplify this math on location.
What problems should I watch for when shooting with strong density filters?
Watch for light leaks around the viewfinder, vibrations from wind, and lens or sensor flare when shooting toward bright light. I also check for color casts and test for vignetting on wide-angle lenses. Carrying a lens hood and dark cloth helps control stray light.
Will a 10-stop filter cause color shifts and how do I fix them?
Some filters introduce slight color casts. I shoot a white balance reference or capture RAW files so I can correct tint and color in post. I also test different brands—Lee, B+W, Hoya, and NiSi—since glass type and coatings affect color neutrality.
Which lenses pair best with a density filter for landscapes and seascapes?
Wide-angle lenses are popular for dramatic foreground-to-background scenes, but medium telephotos compress elements and isolate motion. I use lenses with good edge-to-edge sharpness and low vignetting. Prime lenses or high-quality zooms from Canon, Nikon, Sony, or Sigma often deliver the best results.
How should I compose when aiming for a fine art, milky-water look?
I look for strong foreground interest and leading lines to anchor the scene while the blurred water becomes a soft, textural element. Using low camera positions and balanced exposure between sky and foreground gives the image that ethereal, gallery-ready quality.
Can I stack filters for even slower shutter speeds?
Stacking is possible, but it increases vignetting and flare risk and can change color balance. I prefer a single high-quality 10-stop filter or a variable filter with caution. When stacking, I test for image degradation and keep apertures adjusted to control light.
How do I handle bright skies when I want motion blur below and detail above?
I use graduated neutral density filters or blend multiple exposures in post to keep sky detail while allowing long shutter times for motion. Bracketing exposures and shooting RAW gives me flexibility to balance highlights and shadows during editing.
What shutter speed ranges are typical for smoothing water versus blurring clouds?
For silky water on small streams, I often use 1–5 seconds. For crashing surf or rivers, 5–30 seconds works well. For cloud streaks across a sky, exposures from 30 seconds to several minutes create dramatic motion. I experiment on site to match the scene and light.
Any tips for avoiding camera shake during very long durations?
I lower the tripod’s center column, weigh down the tripod, use a remote release with bulb mode, and enable mirror lockup on DSLRs. If wind is strong, I shield the camera and use shorter legs or a lower stance to minimize vibration.
How do I keep images sharp when using very small apertures to extend shutter times?
Extremely small apertures can cause diffraction, reducing sharpness. I balance by using the smallest aperture that still yields acceptable sharpness—often f/8 to f/16—then increase shutter time with the filter rather than relying solely on tiny apertures.
Are there recommended filter brands for professional results?
I’ve had consistent results with NiSi, Lee Filters, B+W, and Hoya. Each brand offers strengths in color neutrality, build quality, and coatings. I recommend testing a few to find the one that matches your camera system and aesthetic preferences.
How do I learn to judge the right shutter speed in the field?
Practice is key. I start with metered settings and adjust based on how fast elements move. Take a few test shots without the filter if possible, then add the filter and fine-tune. Over time I develop an intuition for how different speeds affect water and clouds.
Oliver Grant is an optics specialist and photography enthusiast focused on lens filters, light control, and visual precision. He explores how different filters and optical technologies shape color, contrast, and exposure, delivering clear and practical insights to help photographers achieve cleaner, more refined images.